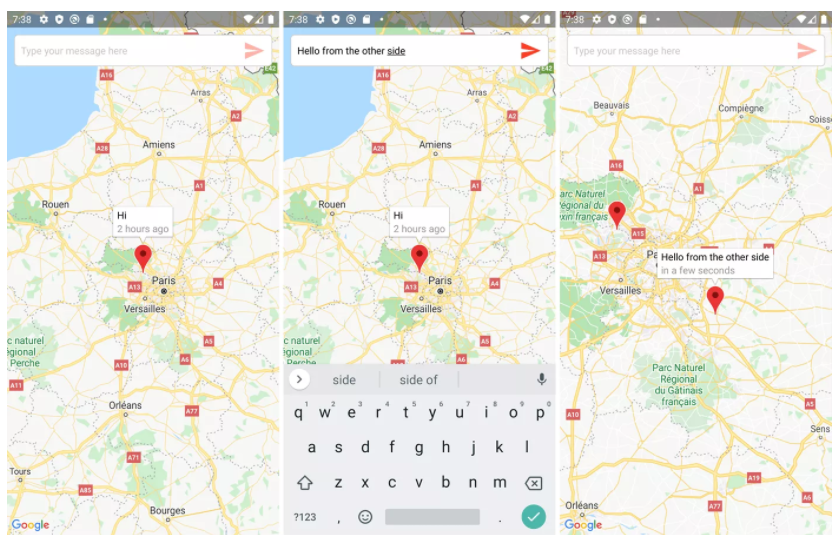
이번에는 map based chat app, example 입니다.
개발 환경: react native, iphone, expo
install : firebase, react-native-maps, mement 등등
android user 는 google map, iphone user 는 apple map app으로 동작하며
user message 입력 시
본인 위치와 message, 그리고 timestamp 이렇게 세가지정보가
다른 user에게 보이는 app 입니다.
tinder app이 지도기반으로 이런식의 동작이 있었던 것 같네요.
완성 화면은 아래와 같습니다.
expo project 생성하고 install 합니다.
그리고 필요한 pkg 들을 미리 install 해놓습니다.
- moment: timestamp 기록을 위한 component
expo init myTutorial
cd myTutorial
npm install @expo/vector-icons
npm install react-native-maps
npm install moment
npm install firebase
expo install expo-location
expo install expo-permissions
npm install react-native-web@~0.11 react-dom
expo start
그다음 firebase console 안에서 app을 등록합니다.
app 추가 - web - 웹 app 만든 후 - Firebase SDK snippet - CDN 에
아래 firebaseConfig 를 복사해서 아래 firebase.js file 에 넣으면 firebase 등록이 완료됩니다.
그 외 settings 은 expo fireabase 를 확인하세요.
docs.expo.io/guides/using-firebase/
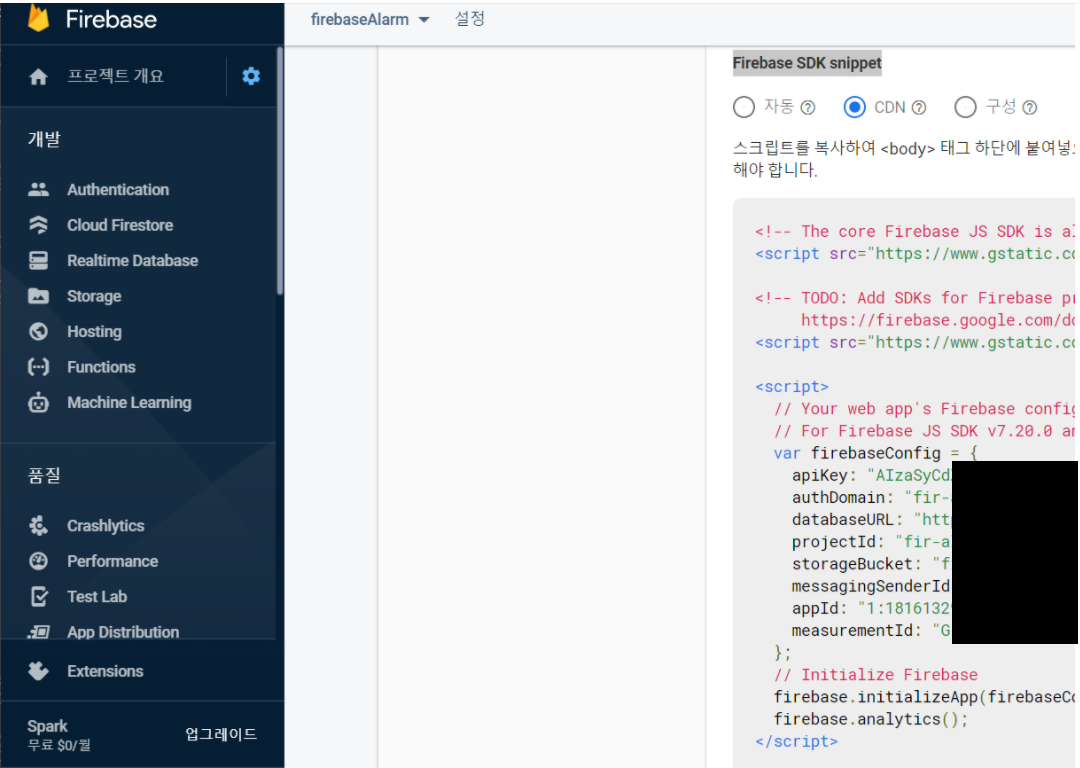
~/src/config/firebase.js
import * as firebase from 'firebase';

const firebaseConfig = {
    apiKey:
    authDomain:
    databaseURL:
    projectId:
    storageBucket:
    messagingSenderId:
    appId:
    measurementId:
};

firebase.initializeApp(firebaseConfig);

export default firebase;
그다음 user 의 현재 location 을 가져오기 위해 아래와 같이 map.js 를 만듭니다.
계산식은 저도 줍줍해온거라 잘모르겠지만
coordinate 와 distance 기반으로 zoom 을 설정하고
위도와 경도를 구하기 위해 쓰이는 code 입니다.
~/src/helpers/map.js
export function getRegion(latitude, longitude, distance) {
    const oneDegreeOfLatitudeInMeters = 111.32 * 1000;

    const latitudeDelta = distance / oneDegreeOfLatitudeInMeters;
    const longitudeDelta = distance / (oneDegreeOfLatitudeInMeters * Math.cos(latitude * (Math.PI / 180)));

    return {
        latitude,
        longitude,
        latitudeDelta,
        longitudeDelta
    }
};
그리고 main code 입니다.
- state: 위도/경도/text/ 그리고 messages array(firebase 에 push 된 data list)
- componentDidMount: firebase에 등록된 20개 data를 가져와서 marker showCallout
- onSendPress: user가 textInput 후 button 누를 시 위도,경도, text, timestamp 를 firebase 에 push.
App.js
import React, { Component } from 'react';
import { TextInput, TouchableOpacity, ToastAndroid, StatusBar, Keyboard, StyleSheet, View, Text } from 'react-native';
import { MaterialIcons } from '@expo/vector-icons';
import MapView, { Marker, Callout } from 'react-native-maps';
import { getRegion } from './src/helpers/map';
import * as Location from 'expo-location';
import * as Permissions from 'expo-permissions';
import firebase from './src/config/firebase';
import moment from 'moment';
export default class App extends Component {
state = {
location: {
latitude: null,
longitude: null
},
messageText: null,
sendButtonActive: false,
messages: []
}
componentDidMount() {
this.getLocation();
firebase.database().ref('messages').limitToLast(20).on('child_added', (data) => {
let messages = [...this.state.messages, data.val()];
this.setState({ messages }, () => {
let { latitude, longitude } = [...messages].pop();
this.map.animateToRegion(getRegion(latitude, longitude, 16000));
if (this.marker !== undefined) {
setTimeout(() => {
this.marker.showCallout();
}, 100);
}
});
});
}
onChangeText(messageText) {
this.setState({
messageText: messageText,
sendButtonActive: messageText.length > 0
});
}
onSendPress() {
if (this.state.sendButtonActive) {
firebase.database().ref('messages').push({
text: this.state.messageText,
latitude: this.state.location.latitude,
longitude: this.state.location.longitude,
timestamp: firebase.database.ServerValue.TIMESTAMP
}).then(() => {
this.setState({ messageText: null });
// ToastAndroid.show('Your message has been sent!', ToastAndroid.SHORT);
Keyboard.dismiss();
}).catch((error) => {
console.log(error);
});
}
}
getLocation = async () => {
let { status } = await Permissions.askAsync(Permissions.LOCATION);
if (status === 'granted') {
let location = await Location.getCurrentPositionAsync({});
this.setState({
location: {
latitude: location.coords.latitude,
longitude: location.coords.longitude
}
});
this.map.animateToRegion(getRegion(location.coords.latitude, location.coords.longitude, 16000));
}
}
render() {
return (
<View style={styles.container}>
<View style={styles.inputWrapper}>
<TextInput
style={styles.input}
placeholder="Type your message here"
onChangeText={messageText => this.onChangeText(messageText)}
value={this.state.messageText}
/>
<View style={{ ...styles.sendButton, ...(this.state.sendButtonActive ? styles.sendButtonActive : {}) }}>
<TouchableOpacity onPress={this.onSendPress.bind(this)}>
<MaterialIcons name="send" size={32} color="#fe4027" />
</TouchableOpacity>
</View>
</View>
<MapView
ref={(ref) => this.map = ref}
style={styles.map}
initialRegion={getRegion(37.53815725, 126.9307627, 160000)}
>
{this.state.messages.map((message, index) => {
let { latitude, longitude, text, timestamp } = message;
return (
<Marker
ref={(ref) => this.marker = ref}
key={index}
identifier={'marker_' + index}
coordinate={{ latitude, longitude }}
pinColor= {this.state.messages.length - 1 === index ? 'blue' : 'red'}
>
<Callout>
<View>
<Text>{text}</Text>
{/* <Text>{index + ' ' + this.state.messages.length}</Text> */}
<Text style={{ 'color': '#999' }}>{moment(timestamp).fromNow()}</Text>
</View>
</Callout>
</Marker>
)
})}
</MapView>
</View>
);
}
}
const styles = StyleSheet.create({
container: {
flex: 1,
backgroundColor: '#fff',
alignItems: 'center',
justifyContent: 'center',
},
map: {
...StyleSheet.absoluteFillObject
},
inputWrapper: {
width: '100%',
position: 'absolute',
padding: 10,
top: 20,//StatusBar.currentHeight,
left: 0,
zIndex: 100
},
input: {
height: 46,
paddingVertical: 10,
paddingRight: 50,
paddingLeft: 10,
borderColor: 'gray',
borderWidth: 1,
borderRadius: 6,
borderColor: '#ccc',
backgroundColor: '#fff'
},
sendButton: {
position: 'absolute',
top: 17,
right: 20,
opacity: 0.4
},
sendButtonActive: {
opacity: 1
}
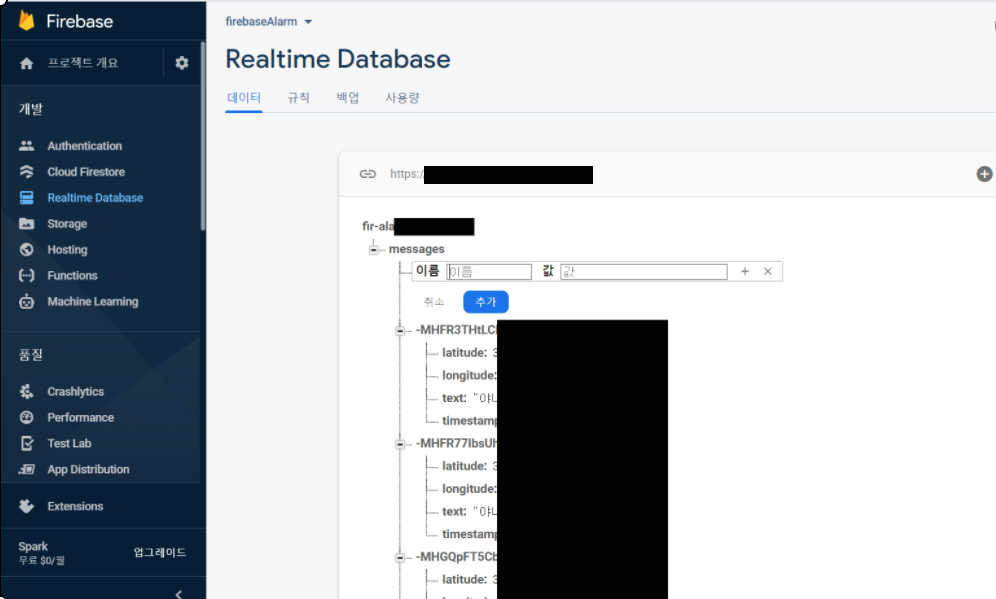
});마지막으로, 다시 firebase 로 돌아와서
realtime database 에 messages - child_added 를 추가하면
지도 input 테스트 시 database 에 input 정보가 등록되는 것을 볼 수 있습니다.
구글 요금제 정책에 보면 월 10GB 까지는 무료입니다.
code 추가 설명 및 출처는 아래 참조하세요
paweldymek.com/en/post/map-chat-app-react-native-firebase-google-maps
Building a Map-based Chat App in React Native with Firebase Realtime Database and Google Maps
This tutorial will show you the process of creating a simple chat application in React Native. Instead of the traditional, text-based look, we will use Google Maps to visualize messages that will be f...
paweldymek.com
'Mobile 개발 > RN Project - Map Chat' 카테고리의 다른 글
| RN - 클릭 위치 주소 얻기, reverse geocoding 적용 (2) | 2021.01.01 |
|---|---|
| RN - 채팅, GiftedChat with realtime database (2) | 2021.01.01 |
| RN - Project 에서 활용한 라이브러리 (2) | 2020.12.05 |
| RN (React Native) - 네이버지도, 클릭 위치 marker 표시 (4) | 2020.09.12 |
| RN (React Native) - 네이버지도 연동 (4) | 2020.09.04 |